


The ring has the best security equipment in the country. The Ring Doorbell is a popular one. You can see and talk to visitors from your phone regardless of where you are. It is an excellent device with many features, but it needs the internet for full function.

It is possible that you have to change the settings on your camera. It could be that you moved to a new place. It is necessary to know how to change the Doorbell settings.
Related: Top 3 Best Canary Smart Security Camera Review and Guide in 2023
Ring Cameras and the Ring Doorbell can be used to watch the area outside your home. They need a constant internet connection.
See video: How to Change Ring Doorbell 2 WIFI Network
How to Change the WiFi Network on Your Google Home
How To Change Wi-Fi on Ring Doorbell
- First of all, launch The Ring Application
- Tap On The Three Lines Icon from the upper left corner.
- Click on the Devices option.
- Choose Your Ring Doorbell model.
- Choose the “Device Health.” option.
- Select the “Change Wi-fi Network.” option.
- Head To The Doorbell location.
- Do as per the On-screen Instructions To Put Your device In the Set-up Mode.
- Select the Desired Wi-fi connection.
- Type in The Network Password and hit the “Continue.” button.
Tap On The Three Lines Icon from the upper left corner.
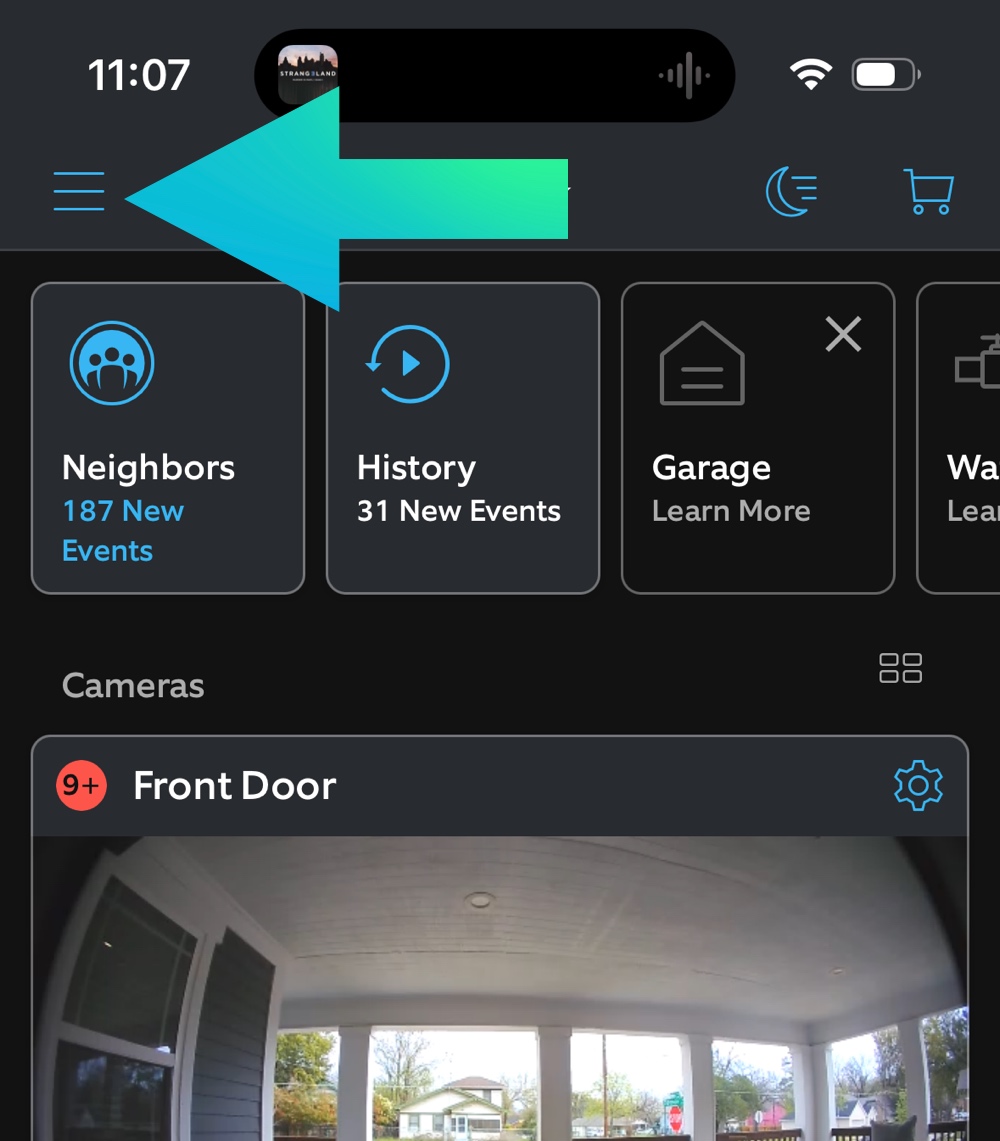
Click on the Devices option

Choose Your Front Ring Doorbell model.

Choose the “Device Health.” option.

Select the “Change Wi-fi Network.” option.

Enter the network password and press “Continue.” The device will connect and you should be all set!

Note: Tips for a successful WiFi connection Here are a few tips to ensure a successful WiFi connection:
- Ensure your smartphone is connected to the same WiFi network you want to connect your Ring Doorbell to.
- Ensure your Ring Doorbell is fully charged before changing the WiFi network.
- Make sure you’re within range of your WiFi network.
- If you’re having trouble connecting to your WiFi network, try resetting your network settings on your smartphone and try again.
Quick Fix: Ring Doorbell Loses WiFi Connection
Troubleshooting WiFi connection issues If you’re having trouble connecting to your WiFi network, here are a few things you can try:
- Ensure your WiFi network is working correctly and you have a strong signal.
- Check that your password is correct and that you are connecting to the correct network.
- Try restarting your Ring Doorbell and your smartphone.
- If all else fails, contact Ring customer support for assistance.
Changing the WiFi on your Ring Doorbell is a relatively simple process that can be completed in just a few steps.
By following the tips and troubleshooting advice provided in this article, you can ensure a successful WiFi connection and continue to enjoy the benefits of your Ring Doorbell. If you’re still having trouble, don’t hesitate to contact Ring customer support for further assistance.
Ring Doorbell Set-up Mode
When setting up your Ring Doorbell for the first time, you must put it into Set-up Mode. This mode lets you connect your device to your home WiFi network and customize your settings.
To enter Set-up Mode, follow these steps:
- Open the Ring app on your smartphone and log in to your account.
- Tap on the three lines in the top left corner of the screen.
- Select Set Up a Device from the menu.
- Select the type of device you want to set up (in this case, Ring Doorbell).
- Follow the on-screen instructions to put your Ring Doorbell into Set-up Mode.
You must put your device in its set-up mode to switch the Wi-Fi network connection.
There are different ways to enter Set-up Mode. Here’s a breakdown of how to do it for each model:
- Ring Doorbell (1st generation): Press and hold the setup button on the side of the device for 15 seconds until the light on the front starts flashing.
- Ring Doorbell 2: Press and release the black button on the front of the device and the light on the front will start flashing.
- Ring Doorbell 3/3 Plus: Press and hold the button on the top of the device until the light on the front of the device starts flashing.
- Ring Doorbell Pro: Press and hold the button on the side of the device until the light on the front starts flashing.
Once your Ring Doorbell is in Set-up Mode, you can connect it to your home WiFi network by following the on-screen instructions in the Ring app.
Changing the Ring Doorbell Password
If you follow the instructions on the screen, use the same method on all your devices.
You can remove the doorbell from the bracket and then tap the orange button at the back of the doorbell. Doorbell 2, 3, 3 Plus, And Elite -Tap the black button on the front of the doorbell. Ring Doorbell Pro-Tap the button on the right side of the doorbell.
- Tap on the icon in the upper left section of the screen.
- From the Account option, select Create a new password.
- Type in your current password. Now, type in the new password and then confirm it.
Thus, you have changed the password for your Ring Doorbell. So I used the following command (for each line):
A password should be at least eight characters long, it should have numbers and special characters besides letters.
See video: How to Change Password on Ring App
Choosing the Ring Doorbell Wi-Fi Frequency
- Wi-Fi routers usually have two different frequencies: 2.4 GHz and 5 GHz.
- You should use the 5 GHz one because it has a more extended range.
- Be sure to check out the compatibility between your existing doorbell and your smart doorbell before ordering.
- All versions are compatible with all frequencies.
- You can choose the frequency you want for the best speed and range.
- If you’re looking for a faster connection, choose the 5 GHz frequency.
How to Prevent Changing The Ring Doorbell WiFi Network
Changing the Wi-Fi network credentials can be required in some situations. However, it is best to avoid changing them.
Getting a New WiFi Router
If you have a new Wi-Fi router, it is best to use your old password and SSID.
If you choose to change the name and password, you must adjust your Kindle device’s Wi-Fi settings.
Avoid Changing from WPA to WPS Security
Changing the security type from WPA2 to WPS is best avoided.
If you change the security settings, you must also change the WiFi on your doorbell.
Get the Ring Chime Pro. It’s a fun accessory that’ll add style to your phone and keep you in touch with your family and friends, no matter where you are.
It is a Wi-Fi extender and it plays a chime sound whenever the doorbell rings.
It is very easy to make an app or website that is connected.
Why Change Wi-Fi on The Ring Doorbell?
You must change the WiFi on the Ring application if you change your Internet Service Provider or password. You need to manually connect the device to the Wi-Fi network when the connection is erratic. You will have to change your Wi-Fi connection if you need to use the mobile hotspot during a power outage.
Conclusion
We hope this helps you understand how to change the Wi-Fi on your doorbell. A Ring owner needs to know that the process is relatively easy. Please write to us if you have questions about the content.
5 Best Home Security Systems with Doorbell Cameras
We tested the best doorbell camera brands, from Arlo to Wyze, on various factors to determine our top picks. There are many video doorbell cameras for your needs.
The Ring Video Doorbell Pro 2 stands out with its advanced motion detection capabilities. Customizable motion zones let you monitor specific areas and receive alerts only when those areas are active. Your home security will be improved by avoiding unnecessary motion notifications.